Installation
Set up WePrintEasy on a Remote Desktop Session Host in about two minutes – with the graphical setup wizard or by command line.
On this page
Preparation
- Check the system requirements: Windows Server 2019, 2022 or 2025 with the Remote Desktop Session Host role, member of an Active Directory domain.
- Try WePrintEasy on a test server first and create a backup or snapshot before installing or updating a production server.
- Download the ZIP file and unpack it on the terminal server, for example to
C:\Install\WePrintEasy.
Setup wizard
Double-click Setup.cmd. The wizard asks for administrator rights and then for the language – English (default) or German. It applies to the setup wizard, the admin console and the agent log and can be changed later under Settings → Language. On an update, the previous language is preselected. The wizard then guides you through six steps and takes about two minutes.
Step 1: Welcome
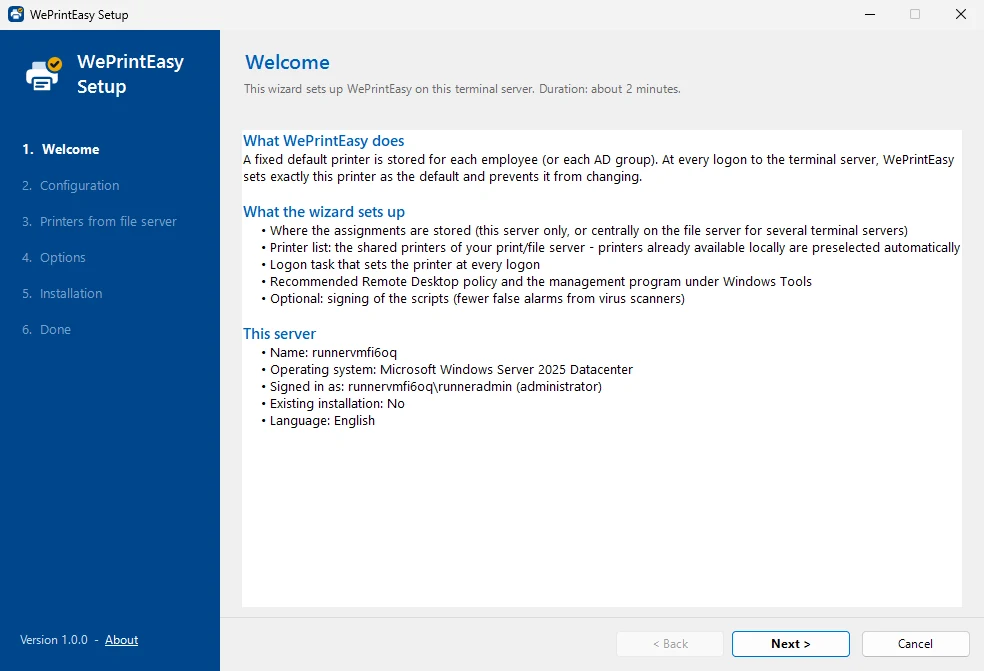
The welcome page explains what WePrintEasy does and what the wizard sets up, and shows information about the server. An existing installation is detected – your assignments are kept.
Step 2: Configuration
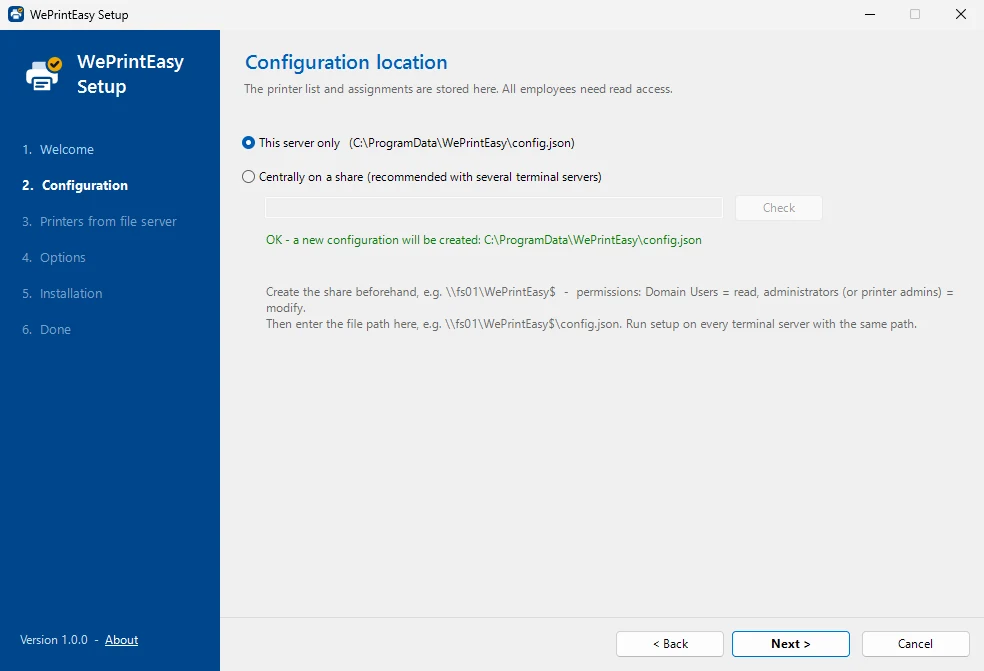
Choose where the printer list and the assignments are stored. All users need read access to this file.
- This server only –
C:\ProgramData\WePrintEasy\config.json. Right for a single terminal server. - Centrally on a share – e.g.
\\fs01\WePrintEasy$\config.json. Recommended for several terminal servers, see RDS farm. Check tests whether the file can be written.
Step 3: Printers from the file server
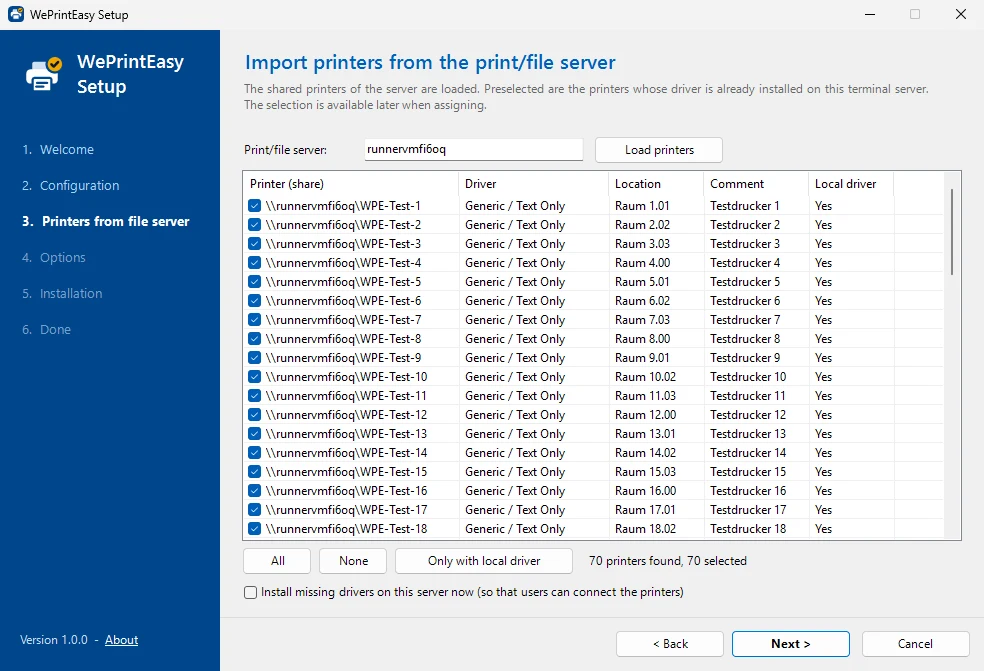
Enter your print or file server and click Load printers. All shared printers appear with driver, location and comment – in the screenshot 70 printers.
- Preselected are the printers whose driver is already installed on this terminal server. The buttons All, None and Only with local driver change the selection.
- Install missing drivers on this server now installs the drivers of the selected printers. This matters because since the PrintNightmare updates, standard users are not allowed to install printer drivers.
The selected printers form the printer list you choose from when assigning printers. You can refresh it later at any time.
Step 4: Options
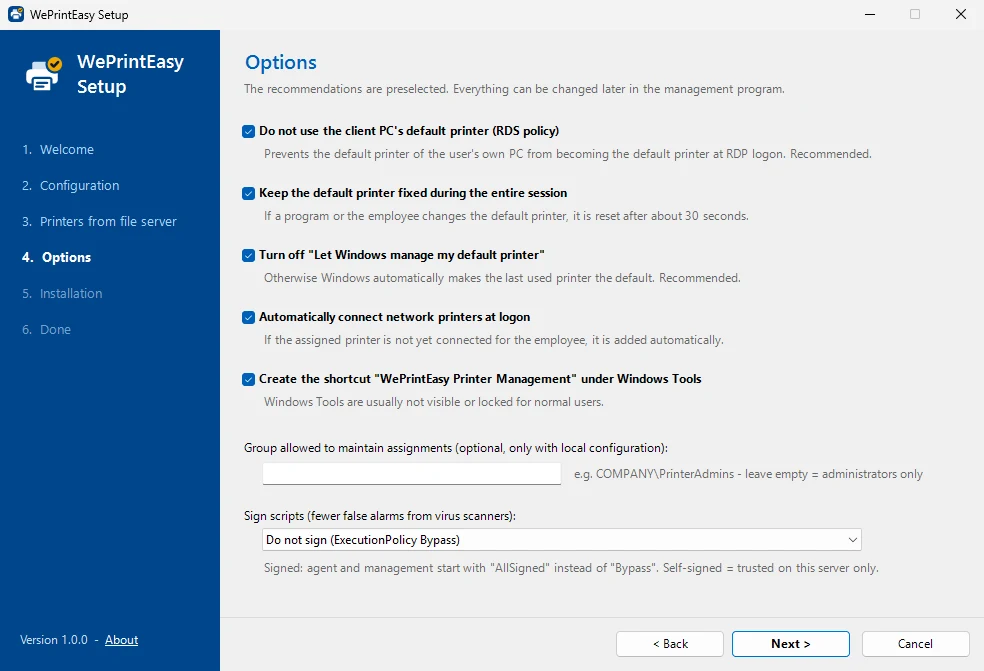
The recommended settings are preselected. Everything can be changed later in the admin console.
| Option | What it does |
|---|---|
| Do not use the client PC’s default printer (RDS policy) | Sets the policy Do not set default client printer to be default printer in a session (fForceClientLptDef = 0). Recommended. |
| Keep the default printer fixed during the entire session | If a program or the user changes the default printer, it is reset after about 30 seconds. |
| Turn off “Let Windows manage my default printer” | Otherwise Windows makes the last printer used the default. Recommended. |
| Automatically connect network printers at logon | Connects the assigned network printer if it is not connected yet. |
| Create the shortcut “WePrintEasy Printer Management” under Windows Tools | Creates the shortcut to the admin console (named after the chosen language). |
| Group allowed to maintain assignments | Optional AD group that may edit assignments without administrator rights (local configuration only). |
| Sign scripts | Optional code signing, see Code signing. |
Step 5: Installation
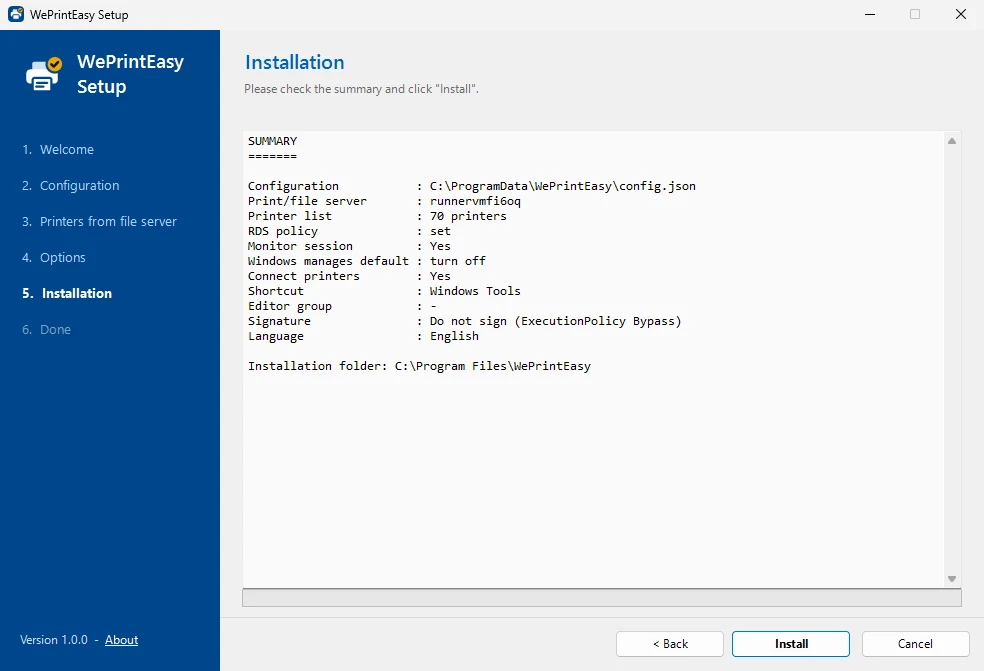
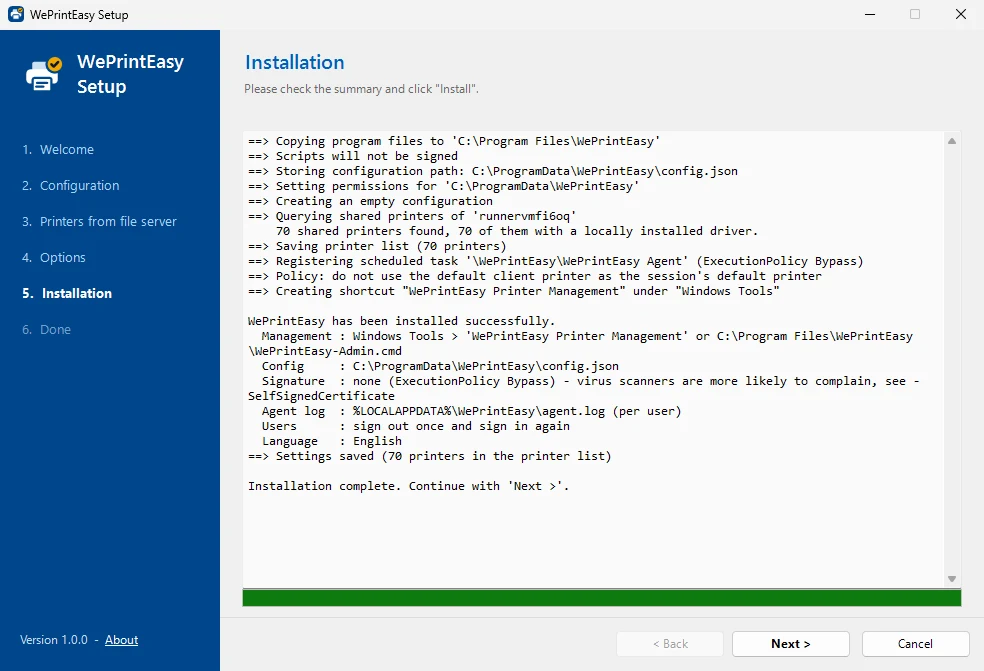
Check the summary and click Install. The live log shows every step: files copied, configuration created, permissions set, printer list saved, scheduled task registered, policy set and shortcut created.
Step 6: Done
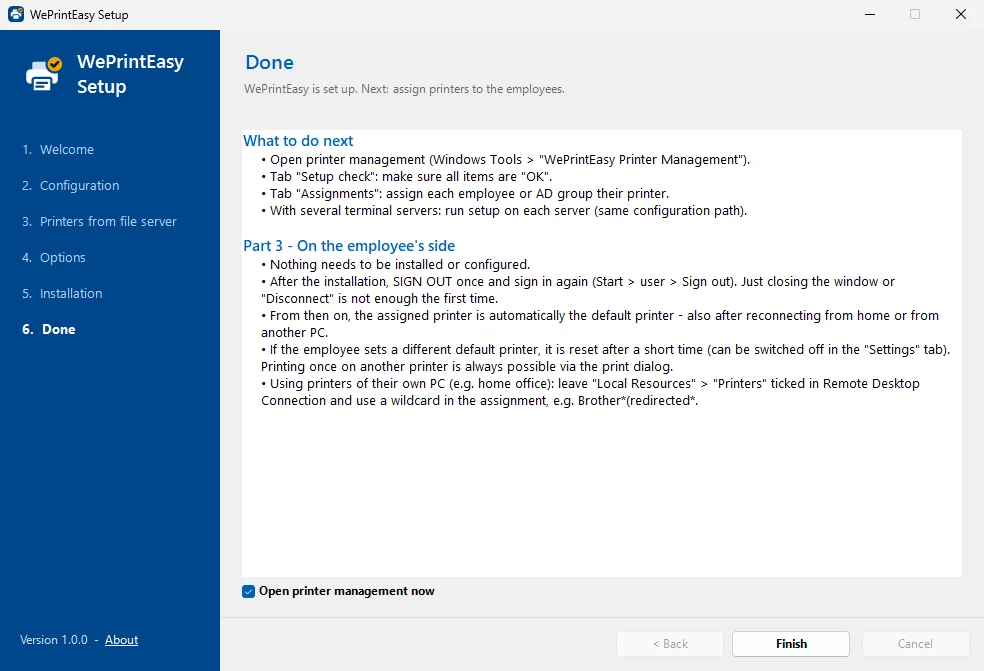
The last page summarises the next steps. With Open printer management now checked, the admin console opens when you click Finish.
Next steps:
- Open the admin console – under Windows Tools → WePrintEasy Printer Management (German interface: WePrintEasy Druckerverwaltung) or
C:\Program Files\WePrintEasy\WePrintEasy-Admin.cmd. - Tab Setup check: check that all items are “OK”.
- Tab Assignments: assign printers to users or AD groups – see the admin guide.
- Several terminal servers? Run the setup on every server with the same configuration path.
After the first installation, users have to log off and on again once (Start → user → Sign out). Just closing the window or disconnecting is not enough the first time. From then on the assigned printer is set at every logon and reconnect.
RDS farm
So that all session hosts use the same assignments, store the configuration centrally:
- Create a share, for example
\\fs01\WePrintEasy$.- Share and NTFS permissions: Domain Users: Read; administrators (or a group such as “Printer admins”): Modify.
- Install WePrintEasy on every session host with the same path – in the setup wizard choose Centrally on a share, or by command line:
.\Install-WePrintEasy.ps1 -ConfigPath '\\fs01\WePrintEasy$\config.json' -PrintServer fs01 -DisableClientDefaultPrinterWith a central configuration, you grant edit rights on the share. With a local configuration, -EditorGroup 'COMPANY\PrinterAdmins' (or the option in the wizard) allows a group to maintain assignments without administrator rights.
“Enforce now” in the admin console checks whether a terminal server reads the same configuration as the admin console – see Troubleshooting.
The language is stored in the configuration as well, so all session hosts with the same configuration use the same language.
Command-line installation
An alternative to the setup wizard, for example for automated installations. Open PowerShell as administrator in the unpacked folder:
Set-ExecutionPolicy -Scope Process Bypass
.\Install-WePrintEasy.ps1 -PrintServer fs01 -DisableClientDefaultPrinter
The installation
- copies the program files to
C:\Program Files\WePrintEasy, - creates the configuration
C:\ProgramData\WePrintEasy\config.json(users may only read it, administrators change it), - with
-PrintServeradds the shared printers of the print server to the printer list (default: only those with a locally installed driver;-ImportPrinters Allfor all;-InstallMissingDriversinstalls missing drivers), - registers the scheduled task
\WePrintEasy\WePrintEasy Agent(triggers: logon and reconnect of an RDP session; runs as the respective user, invisibly), - creates the shortcut “WePrintEasy Printer Management” under Windows Tools (with
-Language de: “WePrintEasy Druckerverwaltung”), - with
-DisableClientDefaultPrintersets the policy Do not set default client printer to be default printer in a session (alternatively via Group Policy).
The script can simply be run again for updates – existing assignments are kept.
Installer parameters
| Parameter | Meaning |
|---|---|
-Language |
Language of installer, admin console and agent log: en (default) or de. Without it, an update keeps the previous language |
-ConfigPath |
Path of the configuration file (local or UNC). Default: C:\ProgramData\WePrintEasy\config.json |
-PrintServer |
Print/file server whose shared printers are added to the printer list |
-ImportPrinters |
WithLocalDriver (default), All or None |
-PrinterListFile |
Text file with one \\server\share per line (instead of -ImportPrinters) |
-InstallMissingDrivers |
Install missing drivers of the added printers |
-EditorGroup |
AD group with write access to the local configuration |
-DisableClientDefaultPrinter |
Set the RDS policy so the client’s default printer is not used |
-InstallPath |
Installation folder (default: C:\Program Files\WePrintEasy) |
-NoShortcut |
Do not create a shortcut under Windows Tools |
-SelfSignedCertificate |
Sign the scripts with a self-signed certificate of this server |
-SigningCertificateThumbprint |
Sign the scripts with an existing code signing certificate (e.g. company CA) |
-TimestampServer |
Timestamp service for the signature, e.g. http://timestamp.digicert.com (internet access required) |
-NoSigning |
Do not sign, or switch off existing signing |
Examples
# Single server, printers with a local driver, RDS policy
.\Install-WePrintEasy.ps1 -PrintServer fs01 -DisableClientDefaultPrinter

# Additionally sign the scripts with a self-signed certificate
.\Install-WePrintEasy.ps1 -PrintServer fs01 -DisableClientDefaultPrinter -SelfSignedCertificate

# Central configuration, all printers, install missing drivers
.\Install-WePrintEasy.ps1 -ConfigPath '\\fs01\WePrintEasy$\config.json' -PrintServer fs01 -ImportPrinters All -InstallMissingDrivers -DisableClientDefaultPrinter
Update
Unpack the new version (or copy it into the previous folder) and double-click Update.cmd (asks for administrator rights). The updater reinstalls the program files and keeps all previous settings: configuration path, assignments, printer list, signing, editor group, RDS policy and shortcut. At the end it shows the system check.
Agents already running in user sessions use the new version from the next logon. For automated updates:
.\Update-WePrintEasy.ps1 -NoPauseCode signing
Without a signature, the logon task starts the agent invisibly with -ExecutionPolicy Bypass. Some antivirus products (for example Panda) consider this pattern suspicious. With signing, all installed scripts are Authenticode-signed, and task, shortcut and WePrintEasy-Admin.cmd start with -ExecutionPolicy AllSigned.
# Self-signed (one server, no CA needed)
.\Install-WePrintEasy.ps1 -SelfSignedCertificate

# Certificate from the company CA (template "Code Signing", with private key in LocalMachine\My or CurrentUser\My)
.\Install-WePrintEasy.ps1 -SigningCertificateThumbprint 'A1B2C3...' -TimestampServer 'http://timestamp.digicert.com'- Self-signed: the certificate
CN=WePrintEasy Codesignatur (<server>)is valid for 5 years and its key cannot be exported. It is only trusted on this server (LocalMachine\RootandLocalMachine\TrustedPublisher). From 30 days before it expires, an update renews it automatically. Uninstalling removes it again. - Company CA: the installer adds the certificate to
LocalMachine\TrustedPublisher. The server must already trust the CA (usual within a domain). - Signing is kept on updates.
-NoSigningswitches it off. - Important: if you change the installed scripts afterwards, their signature becomes invalid and the agent no longer starts. Run the installer again – it signs again. The Setup check tab shows the state under Signature.
- If signing fails, the installer installs unsigned with a warning (
Bypass), so the agent keeps working. - A signature makes false positives rarer but cannot rule them out. If it does not help, exclude the folders
C:\Program Files\WePrintEasyandC:\ProgramData\WePrintEasyin the antivirus software. Never excludepowershell.exeitself.
Uninstall
.\Uninstall-WePrintEasy.ps1                     # configuration is kept
.\Uninstall-WePrintEasy.ps1 -RemoveConfig -RemoveClientDefaultPrinterPolicy
The uninstaller removes the scheduled tasks below \WePrintEasy\, the shortcut, the program folder and the registry key HKLM\SOFTWARE\WePrintEasy. A certificate created with -SelfSignedCertificate is always removed as well; certificates from your CA are left untouched. -RemoveConfig only deletes a local configuration – a central configuration on a share is never deleted, as other servers may use it. Agents that are still running end when the users log off.
Download WePrintEasy ZIP with setup wizard, update and uninstall scripts. Free · MIT licence
Download WePrintEasy 1.0.3